Crochet Cardigan
Hello, my dear reader! Welcome once again to our cozy corner here at Handmade Learning Here, it’s always such a joy to have you with us. Today, we’re sharing a truly special and charming project: a beautiful reversible crochet cardigan that you can wear on both sides. Take a deep breath, grab your favorite yarn, and settle in… because this is one of those creations that feels like a warm hug as you make it.
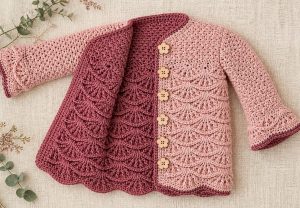
This crochet cardigan is not just another garment, it’s a lovely combination of texture, creativity, and versatility. What makes it extra special is that it can be worn on either side, giving you two different looks in one piece. Just like many of the timeless projects we love, this design brings together elegance and comfort, making it a wonderful addition to your handmade wardrobe.
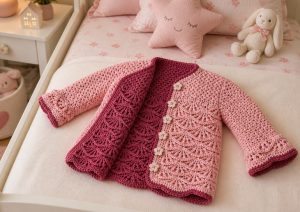
At first glance, the pattern may seem a little detailed, especially with the textured stitches and shaping involved. But don’t worry, when you take it step by step, it becomes a very enjoyable and rewarding experience. You’ll be working with familiar stitches like single crochet and double crochet, while also exploring techniques such as front and back post stitches that create a rich, dimensional texture across the fabric.
One of the most delightful parts of this project is how it’s constructed. You’ll begin with a base section worked flat, where the texture starts to develop beautifully. Then, the piece is divided into sections that form the front panels and the back, helping you gradually shape the cardigan. Watching your work transform from a simple piece into something wearable is truly magical and very satisfying.
As you continue, you’ll shape the neckline, join the shoulders, and move on to the sleeves, which are worked in the round. This is the moment when your cardigan really starts to come to life. The sleeves are finished with decorative details that echo the texture of the body, bringing harmony and balance to the overall design.
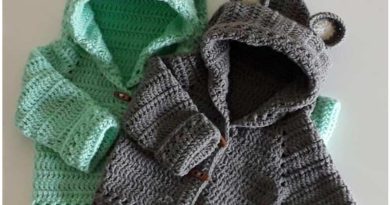
Another lovely feature of this cardigan is its thoughtful construction, allowing it to be worn from either side. This adds a unique touch of practicality and creativity, making your finished piece feel even more special and versatile for everyday wear.
This crochet cardigan pattern is inspired by a beautiful piece that was observed visually. The design was interpreted based on its textures, shapes, and overall construction, with the goal of recreating a similar look through careful observation and crochet techniques.
This is an interpretation developed from inspiration, aiming to capture the essence and style of the original visual reference.
OVERVIEW (Very Important Before You Start)
This cardigan is made in sections:
Bottom body (worked flat)
Divide into:
- Right Front
- Back
- Left Front
Join shoulders, work sleeves in the round, repeat entire piece in second color.
Join layers → reversible finish
MATERIALS
Hook: 5 mm (H/8)
Yarn: Worsted weight
- MC (Main Color)
- CC (Contrast Color)
Buttons
Tapestry needle
GAUGE
4” =
- 16 SC stitches
- 3 shell rows
Gauge matters mostly for height.
ABBREVIATIONS (US TERMS)
- ch = chain
- sc = single crochet
- dc = double crochet
- sl st = slip stitch
- FPDC = front post double crochet
- BPDC = back post double crochet
- FPSC = front post single crochet
Special Stitch:
Seed stitch = (sc, dc) in same stitch
PART 1 — BOTTOM SECTION
Foundation Chain
Ch 90 (94, 102, 106, 114)
Row 1 (RS)
SC in 2nd ch from hook and across
→ total: 89 (93, 101, 105, 113) sts
Ch 1, turn
Row 2 (Shell Setup)
SC in next 6 (8, 6, 8, 6) sts
Skip 2 sts
Repeat:
- 5 dc in next st (shell)
- skip 2 sts
- sc in next 7 sts
- skip 2 sts
Repeat across
End with SC in last 6 (8, 6, 8, 6) sts
Ch 1, turn
Row 3 (Texture – WS)
Work across:
- SC section
- Skip 1 st
- BPDC around next st
- DC between shell stitches below
Repeat this alternating sequence across entire row
End with SC
Ch 1, turn
Row 4 (Texture – RS)
SC in edge stitches
Alternate:
- FPDC around posts
- DC between stitches below
- skip stitches between transitions
This creates raised texture
Ch 1, turn
Row 5
SC across with:
FPSC (front post single crochet) across textured sections
Ch 1, turn
DROP SHELL SECTION
Row 6
- SC edge
- Work long DC 4 rows below
- Skip stitches
- Create shell (5 long DC in same lower space)
This creates the layered twist effect
Ch 1, turn
Row 7
Repeat texture using BPDC + DC between stitches
Row 8
Repeat texture using FPDC + DC
Row 9
FPSC across sections
Row 10
Repeat shell pattern using long DC again
🔁 REPEAT SECTION
Repeat Rows 3–10:
4 (6, 6, 7, 8) times
Until height is approx:
10 (11, 12, 14, 15.5) inches
Final Rows
Repeat:
Row 3
Row 4
Edge Row
SC across:
Pattern:
- SC groups
- skip stitches
- SC 13
- repeat across
Fasten off
PART 2 — SPLITTING THE BODY
Turn work and begin working into foundation chain edge.
RIGHT FRONT PANEL
Row 1
Attach yarn
- DC across
- Insert long DC into previous shell spaces
Ch 1, turn
Row 2
Work seed stitch across
End with HDC
Ch 1, turn
Rows 3–7
Repeat seed stitch rows
SHAPING (Important)
You will now decrease gradually:
Decrease Rows Pattern
Repeat alternating:
- Row A:
Seed stitch across
Skip stitch near end
SC final stitch
(no chain turn) - Row B:
Slip stitch + DC combo
Continue seed stitch
This creates neckline shaping
Continue until:
- Size-specific row count reached
- Smaller sizes stop earlier
Fasten off
PART 3 — BACK PANEL
Attach yarn at center section
Row 1
DC across with shell repeats
Row 2+
Repeat seed stitch rows evenly
NO decreases
Continue until same height as fronts
Fasten off (leave long tail)
PART 4 — LEFT FRONT
Repeat right front instructions
BUT mirrored shaping
Decreases happen on opposite side
PART 5 — SHOULDER SEAMS
- Turn inside out
- Sew shoulders together
- Turn right side out
PART 6 — SLEEVES (IN THE ROUND)
Join yarn under arm
Round 1
Seed stitch evenly around armhole
Join with sl st
Ch 1
Round 2+
Continue seed stitch
Increase Rounds
At intervals:
- 2 SC in same stitch
This widens sleeve
Continue until desired length
CUFF (Decorative Section)
Repeat:
- Shell row (5 DC in same stitch)
- BPDC texture row
- FPDC texture row
- FPSC row
- Drop shell rows
Same pattern as body
Fasten off
PART 7 — REPEAT ENTIRE GARMENT
Make second cardigan in contrast color
PART 8 — JOINING (REVERSIBLE MAGIC)
Place wrong sides together
Align all edges
Join Edges
SC through both layers:
Around cuffs
Around front edges
Around neckline
BUTTONHOLES
Create spaces:
Ch 2, skip 2 stitches
Repeat evenly along front edge
FINAL BORDER
SC evenly around entire piece
Add extra SC in corners to prevent pulling
FINAL STEP
Sew buttons, weave in ends.

This crochet cardigan pattern is inspired by a beautiful piece that was observed visually. The design was interpreted based on its textures, shapes, and overall construction, with the goal of recreating a similar look through careful observation and crochet techniques. This is an interpretation developed from inspiration, aiming to capture the essence and style of the original visual reference.
In conclusion, this crochet cardigan is more than just a project, it’s a gentle journey through texture, technique, and creativity. Each stitch builds something meaningful, and the final result is a piece you can truly be proud of. Whether you’re making it for yourself or as a heartfelt gift, it carries warmth and care in every detail.
Thank you so much for spending this time with us, dear reader. We hope this pattern inspires you to pick up your hook and create something beautiful. Feel free to explore more patterns here on the blog, there’s always something new waiting for you. Until next time… happy crocheting and see you soon!