Log Cabin quilt
Welcome to Handmade Learning Here, dear quilting friend. We’re so happy you stopped by our cozy little corner filled with fabric, creativity, and handmade inspiration. Whether you’ve been quilting for many years or are just beginning your sewing journey, we hope you’ll feel right at home here with us. Today we’re sharing a beautiful modern Log Cabin quilt inspired by the timeless charm of traditional cabin-style patchwork, but with a fresh and elegant twist created through dramatic light-and-dark contrast.
This stunning quilt design uses carefully arranged Log Cabin blocks to create flowing diamonds and movement across the quilt top, giving the entire piece warmth, texture, and wonderful visual depth. It’s the perfect project for quilters who love classic patterns with a modern cozy feel, and it’s also a lovely way to practice piecing, color placement, and quilting techniques in a relaxing and rewarding way. So gather your favorite fabrics, settle into your sewing space, and let’s create something truly beautiful together.
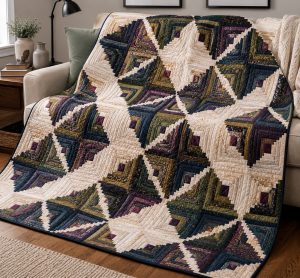
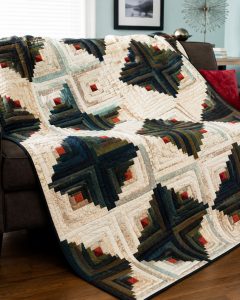
There’s something truly magical about a Log Cabin quilt. Maybe it’s the comforting symmetry, the beautiful sense of movement, or the way simple strips of fabric can come together to create something so rich and elegant. The Contrasting Cabin style takes that classic Log Cabin look and gives it a dramatic twist by pairing lights and darks in a way that creates glowing diamonds across the quilt top. It’s bold, cozy, timeless, and surprisingly relaxing to sew once you understand the rhythm of the blocks.
This tutorial is inspired by the beautiful “Contrasting Cabins” quilt design while carefully rewritten in an original beginner-friendly format. Instead of copying the original pattern instructions or diagrams, we’ll gently walk through the techniques and construction process in a warm, easy-to-follow way designed especially for newer quilters. The original quilt uses traditional Log Cabin construction with carefully rotated blocks to create striking light-and-dark diamonds across the finished quilt top.
So pour yourself a cup of tea, gather your prettiest fabrics, and let’s stitch something beautiful together.
What Is a Log Cabin Quilt?
The Log Cabin block is one of the most beloved quilt blocks in quilting history.
At its heart:
- a small center square sits in the middle,
- and strips called “logs” are sewn around it in rounds.
Traditionally:
- one side of the block is made with lighter fabrics,
- and the opposite side uses darker fabrics.
When several blocks are rotated and arranged together, beautiful shapes begin to appear almost like magic.
In the Contrasting Cabin layout:
- light diamonds,
- dark diamonds,
- and dramatic geometric movement
emerge across the quilt top through block rotation alone.
Finished Quilt Information
The quilt finishes at approximately:
- 72½” × 96½”
with:
- 12” finished blocks.
This makes a lovely twin-size quilt with a generous drape.
Supplies You’ll Need
Fabrics
- Light quilting cotton fabrics
- Dark quilting cotton fabrics
- Small accent fabric for centers
- Binding fabric
- Backing fabric
- Batting
Sewing Supplies
- Rotary cutter
- Acrylic quilting ruler
- Cutting mat
- Sewing machine
- Neutral piecing thread
- Iron and pressing mat
- Pins or clips
Suggestion – For your quilt beautifully mixes:
- creams,
- grays,
- blacks,
- browns,
- soft turquoise,
- and touches of red
for extra warmth and contrast.
Understanding the Color Placement
This quilt becomes especially striking because of the contrast between:
- lights,
- darks,
- and the tiny center squares.
The original design alternates different dark fabrics between rounds to create subtle movement inside the dark side of the blocks.
But don’t worry, dear friend:
you do NOT need to overcomplicate things as a beginner.
The most important thing is:
- keeping your light fabrics lighter,
- and your dark fabrics darker.
Strong contrast is what creates the beautiful diamond effect later on.
Beginner Fabric Tip
Before sewing:
divide fabrics into two piles:
LIGHTS
DARKS
Then lay them out on a table.
If a fabric blends too much into the opposite pile, set it aside.
This little step makes a huge difference once the quilt is assembled.
Cutting Your Fabrics
The quilt uses many narrow strips sewn around a center square.
For beginners:
- label your strips by size,
- keep lights and darks separated,
- and organize them in trays or zip bags.
The original quilt uses:
- a 2½” center square,
- surrounded by 1½”-wide strips in gradually increasing lengths.
As the block grows:
- each strip becomes slightly longer than the last.
This is what creates the staircase effect of the Log Cabin design.
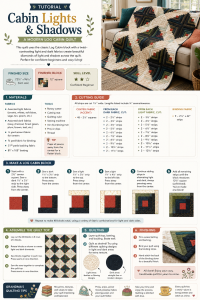
How Log Cabin Construction Works
The strips are added in a rotating sequence around the center.
You’ll always:
- sew one strip,
- press,
- rotate the block,
- add another strip,
- and continue building outward.
Once you understand the rhythm, the process becomes wonderfully relaxing.
Many quilters say Log Cabin quilts are almost meditative to sew.
Step-by-Step Tutorial
Step 1 — Start with the Center Square
Take:
- one small center square.
This little center becomes the heart of your block.
Traditionally, red centers symbolize the warmth of a hearth or home.
Place the square right side up on your workspace.
Step 2 — Add the First Dark Strip
Choose:
- a short dark strip.
Place it right sides together along one side of the center square.
Sew using a consistent ¼” seam allowance.
Press the seam away from the center.
This pressing direction helps keep the block flat and neat.
Step 3 — Add the Second Dark Strip
Rotate the unit slightly.
Now sew another dark strip to the adjacent side.
Again:
- sew,
- press away from center,
- and trim any uneven edges if needed.
Already your tiny Log Cabin begins taking shape.
Step 4 — Begin the Light Side
Now we introduce the lighter fabrics.
Add:
- one light strip to the top,
- then another to the left side.
Press after every seam.
The contrast between the dark side and light side is what gives the block its classic appearance.
Step 5 — Continue Adding Rounds
Now continue building outward around the center.
Each new strip becomes longer as the block grows.
A simple beginner rhythm is:
- dark strip
- dark strip
- light strip
- light strip
Then repeat.
The original quilt uses several rounds of progressively longer strips to finish each block at approximately 12½” unfinished.
Step 6 — Press Carefully
Pressing matters tremendously in Log Cabin quilting.
For beginners:
- press after EVERY strip.
Do not skip this step.
Flat seams help:
- blocks stay square,
- corners line up,
- and the quilt top assemble more smoothly later.
Avoid dragging the iron, which can stretch the block.
Instead:
- lift,
- press,
- and lower gently.
Step 7 — Trim the Finished Block
Once all strips are added:
- square the block carefully.
Trim to:
- 12½” unfinished size.
Using a large square ruler helps tremendously here.
Take your time.
Accurate trimming makes quilt assembly much easier later on.
Step 8 — Make Additional Blocks
Repeat the same process until all blocks are completed.
The original quilt uses:
- 48 Log Cabin blocks total.
This may sound like a lot, but once the process becomes familiar, blocks sew together surprisingly quickly.
Many quilters enjoy chain piecing several blocks at once to speed things up.
Step 9 — Lay Out the Quilt
Now comes the magical part.
Lay all blocks out across the floor or a large table.
Rotate blocks carefully.
As they turn:
- light diamonds,
- and dark diamonds
begin appearing across the quilt top.
This visual movement is one of the most beautiful features of the design.
Take your time here.
Small rotations completely change the final appearance.
Step 10 — Sew Rows Together
Once your layout feels balanced:
- sew blocks into rows.
Press seams in alternating directions between rows.
This helps seams nest neatly together when joining rows later.
Then sew the rows together to complete the quilt top.
Step 11 — Create the Quilt Sandwich
Now layer:
- backing fabric
- batting
- quilt top
Smooth carefully from the center outward.
Baste using:
- safety pins,
- spray baste,
- or long hand stitches.
The flatter the layers now, the easier quilting becomes later.
Step 12 — Quilt the Layers
The original quilt combines:
- feathered quilting in light diamond areas,
- and straight-line quilting in the dark sections.
But beginners can absolutely keep things simple.
Beautiful beginner-friendly quilting ideas include:
- straight-line quilting,
- stitch-in-the-ditch,
- gentle echo quilting,
- or diagonal lines.
Remember:
the piecing itself already creates dramatic visual interest.
Step 13 — Add the Binding
Finally:
- trim excess batting,
- square the quilt,
- and attach binding.
Dark binding beautifully frames this style of quilt and helps define the contrast inside the design.
Hand stitching the final binding edge is one of the most peaceful and satisfying parts of quilting.
Beginner Tips for Success
- Keep lights and darks clearly separated
- Press after every strip
- Square blocks carefully
- Use consistent seam allowances
- Rotate blocks slowly during layout
- Take photos before rearranging
- Trust the process
Log Cabin quilts often look chaotic during construction…
until suddenly everything clicks beautifully into place.
Why Quilters Love Contrasting Cabin Quilts
There’s something timeless about the balance between:
- light and shadow,
- warmth and contrast,
- simplicity and complexity.
Even though the quilt is built from one repeated block, careful placement creates movement and elegance across the entire quilt top.
And perhaps that’s the true magic of quilting:
simple pieces stitched patiently together becoming something extraordinary.
LOG CABIN QUILT PDF PATTERN
VIDEO TUTORIAL
We’ve included a video tutorial from The Sewing Club channel to help and inspire you to make your beautiful Log Cabin Quilt. You can easily find other tutorials on YouTube as well.
Thank you so much for spending part of your day with us here at Handmade Learning Here. We truly hope this cozy Log Cabin quilt tutorial inspired you to slow down, enjoy the creative process, and fill your home with handmade warmth and comfort. Quilts like these become so much more than fabric and thread, they become memories, stories, and little pieces of love stitched together one seam at a time.
Before you go, we warmly invite you to explore the rest of our blog, where you’ll discover many other unique quilt patterns, beginner-friendly tutorials, creative sewing ideas, and cozy handmade projects designed to inspire quilters of every skill level. We’ll be sharing brand new quilting and crafting articles every single week, so we would absolutely love for you to come back and visit us again soon. Until next time, dear friend, we wish you a beautiful day filled with peace, creativity, happy stitching, and many cozy handmade moments ahead.